Wednesday, September 26, 2018

Compare Wercker and Jenkins

Here, I am trying to explore the features of Wercker and Jenkins. Its clear that the Jenkins has a good end-user count, and it can install in your local networks.

Here is a high level comparison


  • Wercker’s Open Source CLI tool enables developers to do much of the rapid iteration in a build/test/deploy model without leaving their local development environment, the Wercker CLI runs the same core tech of our online SaaS product so developers can move toward achieving dev/prod parity. Jenkins is a do-anything box. You have to spend time setting it up to do Docker runs, including keeping your build environment clean.
  • Wercker Pipelines enables full build, test and deployment pipelines to be executed, with Docker as a first class citizen, everything runs in a docker container and artifacts can be docker containers. In Jenkins we need to add slave node pools. The jobs will run on these nodes.
  • Wercker Releases is a private Docker registry that allows you to store your Docker container images on Oracle Cloud Infrastructure for fast, scalable retrieval and deployment. Wercker container registry is fully Integrated with Wercker pipelines and clusters. In Jenkins, we need to add and configure the registry.
  • Wercker clusters is a fully managed Kubernetes engine running on high performance Oracle Cloud Infrastructure. Tightly coupled to Wercker Releases and Pipelines. Clusters is dynamically scalable from one dashboard on the Wercker interface. For Jenkins, we need to manually configure to scale automatically.
  • Wercker is extensible and can be more deeply integrated in to other parts of the application development process. In the case of Jenkins, we need to depend on plugins and these plugins may not be the exact use case for us.

  • Wercker is based on simple yml instructions using our community of public steps (that don't need to be downloaded, installed). In Jenkins we need to learn groovy scripting

  • In Wercker your configuration is stored in your application repo rather than in a dedicated Jenkins repo which makes the project more portable and easier to on board new devs.

Monday, September 24, 2018

How to setup NFS filer (File Storage) in OCI

Purpose:
This document will help to create NFS file storage system in OCI. We mainly used this storage for Kubernetes application storage. The docker running on this host will automatically mount this storage. 

Steps in creating NFS filer are the following:

1. Login to your cloud account.
2. From Action Menu, select File Storage

3. Click on "Create File System", choose the compartment, input the name and availability domain.

4. Click on the "mydatastore" File Storage, you can see mount targets and its details.

5. Note down the commands for mounting this datastore into the client machines, by clicking on "mount commands"
6. Login to the client machine and issue the noted mount commands. 
7. Check df -h or fdisk -l to verify the mounts.

Wednesday, September 19, 2018

How to create Oracle MySQL Cloud Service

Oracle MySQL Cloud Service is a single MySQL server having full access to the features and its operations.

Steps in creating an instance of Oracle MySQL Cloud Service

1. Login to your cloud account.
2. From Action Menu, select Open Service Console

3. Click Create Service
4. Input the Instance Name, Region and Availability Domain

5. Next page, input the compute shape, ssh key, cloud storage container, username, password, storage size, administrator username, password, database schema name and port.

6. Once you confirm, you could see the mysql instance running in your dashboard.
7. With your ssh keys and inputed connection string, you can either ssh or connect database from your application.

Appendix

How to create an Object Storage in OCI

Purpose:
Object storage in OCI is an internet-scale, high-performance storage platform that offers reliable and cost-efficient data durability. It can hold
your static contents like images, pdfs, files etc. There are two types of storage tier - Standard (hot storage) and Archive (cold storage).

Steps in creating Object Storage:
1. Login to your OCI account.
2. Navigate to Menu --> Object Storage --> Object Storage

3. Click on "Create Bucket"
4. Select the storage tier, by default it will be Standard
Appendix:
Overview of Storage
Managing Buckets

Tuesday, September 18, 2018

How to create an OKE cluster

Purpose: 
Creating an OKE cluster in OCI. Once cluster is ready, you can deploy your application.

Assumption:
1. You already have an OCI account with proper roles and policies to create and configure OKE.
2. You have a VCN, subnets

Steps in setup and configuration:
1. Login to your OCI account.
2. Navigate to Menu --> Developer Services --> Container Clusters (OKE)

3. Choose the correct compartment
4. Click on the "Create Cluster" button and input the name, K8s version, VCN, subnets and if needed the CIDR block for the b8s service.

5. Wait for some time, the Cluster status needs to change from "Creating" to "Active"
6. Click on the created cluster name
7. Add Node Pool
8. Input name, version, image, shape, subnets, quantity per subnet, public ssh key and labels.
9. Wait for some time, you can see the node pools getting machine allocated and it will install all the necessary softwares and packages.
10. Once its ready, you can login to those worker machines.

How to Access Kubeconfig:
Following steps demonstrated how to access the OKE kubeconfig file.
1. You need to download and install the OCI CLI and configure it for use.
2. mkdir -p $HOME/.kube
3. oci ce cluster create-kubeconfig --cluster-id ocid1.cluster.oc1.eu-frankfurt-1.aaaand --file $HOME/.kube/config

More links:
https://docs.cloud.oracle.com/iaas/Content/ContEng/Concepts/contengprerequisites.htm
https://docs.cloud.oracle.com/iaas/Content/API/SDKDocs/cliinstall.htm?tocpath=Developer%20Tools%20%7CCommand%20Line%20Interface%20(CLI)%20%7C_____1
https://docs.cloud.oracle.com/iaas/Content/API/SDKDocs/cliconfigure.htm?tocpath=Developer%20Tools%20%7CCommand%20Line%20Interface%20(CLI)%20%7C_____2
https://docs.cloud.oracle.com/iaas/tools/oci-cli/latest/oci_cli_docs/cmdref/ce.html#description

Sunday, September 16, 2018

Introduction to rsync, a free powerful tool for syncing data

Rsync (Remote Sync) is a command for copying and synchronizing files and directories remotely as well. You can easily mirror your data by comparing source and destination.
For a typical transfer, rsync compares filenames and file timestamps on the source and destination directory trees to assess which files should be transferred.
Also rsync can effectively resume transfers that have been halted or interrupted.

Advantages of Rsync:

  • It efficiently copies and sync files to or from a remote system.
  • Supports copying links, devices, owners, groups and permissions.
  • It’s faster than scp (Secure Copy).
  • Rsync consumes less bandwidth


How to install Rsync:
By default rsync package is bundled with OS, else you need to use your package mangers like yum, apt-get to install rsync.

Basic Syntax:
rsync [options] source destination

Some common options used with rsync commands:
-v : verbose
-a : archive mode
-z : compress file data
-h : human-readable
-r : copies data recursively 

To Sync two data centers with delete optionsrsync -avz --delete 11.0.2.2:/data/ /data


Here are some of the examples, have a try in a test environment or use a dry run option:

1. Copy/Sync a File on a Local Computer
[root@shvijai]# rsync -zvh myfilesp.tar /tmp/backups/

2. Copy a Directory from Local Server to a Remote Server
[root@shvijai]$ rsync -avz www/ root@192.168.0.101:/home/

3. Copy/Sync a Remote Directory to a Local Machine
[root@shvijai]# rsync -avzh root@192.168.0.100:/home/shvijai/www-files /tmp/mywebsite

4. Copy a File from a Remote Server to a Local Server with SSH
[root@shvijai]# rsync -avzhe ssh root@192.168.0.100:/root/backup.log /tmp/

5. Copy a File from a Local Server to a Remote Server with SSH
[root@shvijai]# rsync -avzhe ssh mybackup.tar root@192.168.0.100:/mybackups/

6. Use of –include and –exclude Options
[root@shvijai]# rsync -avze ssh --include 'R*' --exclude '*' root@192.168.0.101:/var/lib/rpm/ /mnt/rpm

7. Use of –delete Option
[root@shvijai]# rsync -avz --delete root@192.168.0.100:/var/lib/rpm/ .

8. Automatically Delete source Files after successful Transfer
[root@shvijai]# rsync --remove-source-files -zvh mybackup.tar /mnt/mybackups/

9. Do a Dry Run with rsync
root@shvijai]# rsync --dry-run --remove-source-files -zvh mybackup.tar /mnt/mybackups/

Friday, September 7, 2018

Setting up a NAT instance in Oracle Cloud Infrastructure

Goal

In multi tier architecure design, we are placing our databases in a private subnet with no public IP and web-servers in public subnet which can have public IP. The Idea here is only the front end web-servers will be able to communicate with the backend servers, and backend servers cannot be directly accessed by outside world. But in some cases we may need internet access on private subnet machines for updating/installing softwares, patches etc. Here I will show you how to achieve this goal by using a NAT instance in OCI.

What we are going to do?

Our plan is to configure a Linux box in public subnet as a router (NAT - Network Address Translation). All the machines in the private subnet to initiate outbound IPv4 traffic to the internet at the same time those instances are prevent from receiving inbound traffic initiated by someone on the internet. The route table for those machines in private subnet will be the nat instance IP.

Architecture


Assumption
  • You have an OCI account with needed permissions to create instance, network components.
  • You already have a compartment to work on.

Follow the steps to reach our goal

Create VCN and Internet Gateway

Create a VCN with CIDR block value will be 10.0.0.0/16


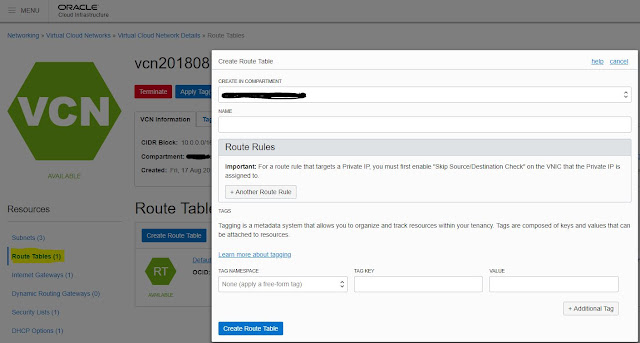
Create Public and Private Route tables


Create Private and Public Security Rules
We can add rules later for each security list, let it be clean now


Create Private and Public Subnet
Private subnet maps to CIDR Block 10.0.0.0/24 , Private Route Table, Private Security List and Public subnet maps to CIDR Block 10.0.10.0/24 , Public Route Table, Public Security List


Edit Public and Private Security List to allow the following IP and protocol

Ingres Rules for Public Subnet
- Allow SSH from anywhere 0.0.0.0/0
- Allow Ping ICMP from hosts in the Private Subnet 10.0.0.0/24
- Allow TCP from hosts in the Private Subnet 10.0.0.0/24
Egress Rules for Public Subnet
- Allow outgoing All Protocols to go out Everywhere 0.0.0.0/0
Ingres Rules for Private Subnet
- Allow SSH from 10.0.10.24
Egress Rules for Private Subnet
-Allow Outgoing all protocols to everywhere 0.0.0.0/0

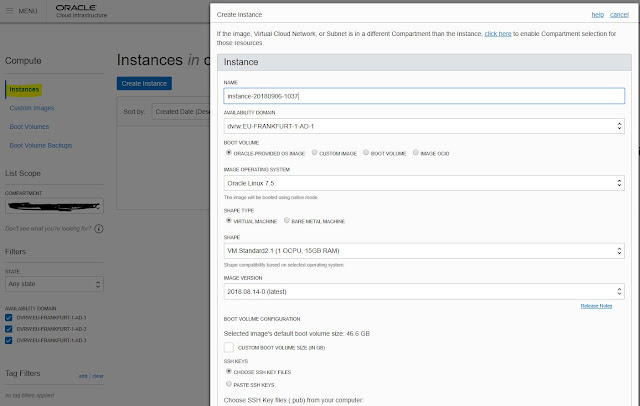
Create backend Server , Attach it to Private Subnet


Create NAT Instance , Attach it to Public Subnet


VNIC Configurations under Public Subnet

On NAT instance, edit the VNIC for to enable "Skip Source and Destination check"


Add one more Private IP Address 10.0.10.20  and Select NO Public IP


SSH to Public IP of NAT Instance

Login to the public server and upload your private ssh key to login to the private subnet server. Confirm whether you can SSH to private server from the public server

We need to configure this machine as a router. Create file to be used when enabling ip forwarding

vi /etc/sysctl.d/98-ip-forward.conf

net.ipv4.ip_forward = 1 

Save the file.

Run firewall commands to enable masquerading and port forwarding

firewall-offline-cmd --direct --add-rule ipv4 nat POSTROUTING 0 -o ens3 -j MASQUERADE

firewall-offline-cmd --direct --add-rule ipv4 filter FORWARD 0 -i ens3 -j ACCEPT

/bin/systemctl restart firewalld

sysctl -p /etc/sysctl.d/98-ip-forward.conf

Setting up NAT Address to all incoming traffic to NAT

This rule allows packets from the private subnet to route through the NAT instance (10.0.10.20)


Its the time to TEST

Login to your private server, see whether you can ping oracle.com or even curl/wget to oracle.com. Also you can see whether yum update works or not.
This means all the packets get routed to the NAT instance and from there it reaches to the internet gateway.
I am pretty much sure that you are thinking to automate this. No worries, we already have a Terraform scripts to automate the entire process. Want to know more, Click here