Friday, November 23, 2018

Simple shell script to check whether a process is running or not, if not it will start it

I need a simple shell script to check whether a process is running or not, if not it will start it.

Here in this example, i am checking my node process.

if ! pgrep -x "node" > /dev/null
then
   nohup start.js &

fi

Tuesday, November 20, 2018

Project Helidon - microservice framework for Java

Project Helidon, an open source, lightweight microservices framework for Java. It supports the MicroProfile technology and is intended to make it easier to develop microservices. Helidon has a collection of Java libraries for writing microservices that will run on a web core powered by the Netty framework. Helidon supports cloud application developments along with health checks, metrics, tracing, and fault tolerance.  Helidon has what you need to write cloud ready applications that integrate with Prometheus, Zipkin and Kubernetes. It is also compatible with all IDEs with no special plugins required. Developers need JDK9 or JDK8, Maven 3.5 and any IDE they prefer to start with Helidon.

Java EE is a stable technology but it has a lot of legacy code. Instead of building microservices on top of Java EE, a new framework which is designed to build microservices from the scratch. That's how Helidon was born. Helidon provides configuration and security for the development of microservices.

What are the most common use cases for Helidon?
Helidon is designed for creating Java microservices. So if you’re a Java developer and you’re writing microservices, then Helidon is a great choice. It’s unique in that provide a way for Java EE developers to use familiar APIs (with our MicroProfile support), but also have the option to explore or use the leaner set of APIs provided by Helidon SE. This helps to improve developers productivity.

Helidon development team is working to integrate on GraalVM support, as it saves money for customers. It will make application start and run faster. Running faster means servicing more requests per instance. Servicing more requests means you need fewer instances. Fewer instances means less money. 

Helidon is packaged in two versions:

- Helidon SE, a lightweight microframework developed in a reactive way. JDK (Java SE Development Kit) serves as the runtime.
- Helidon MP, a MicroProfile implementation providing a development experience familiar to Java EE and Jakarta EE developers. It serves as a runtime for microservices.


What’s next for Helidon?
As part of the Helidon 1.0 release, there will be Oracle Cloud integration with CDI extension, also team have some plan to add a Reactive HTTP client. Inspide of this team is looking at adding support for NoSQL, Eventing and OpenAPI.

URL : https://helidon.io/#/
Documentation : https://helidon.io/docs/latest/#/getting-started/02_base-example

Tuesday, October 23, 2018

When delete a pod in kubernetes, it respawn the same again

Issue:

When we delete a pod using kubectl command, it get respawn automatically. This is one of the feature of Kubernetes.

[root@compute-instance1 ~]# kubectl get pods | grep ImagePullBackOff
quickstart-se-68d7ffb868-l7pvk                    0/1       ImagePullBackOff   0          12m

[root@compute-instance1 ~]#

How to solve this?

[root@compute-instance1 ~]# kubectl get all
This command will list down all the details.

[root@compute-instance1 ~]# kubectl delete deploy/quickstart-se svc/quickstart-se
deployment "quickstart-se" deleted
service "quickstart-se" deleted
[root@compute-instance1 ~]#

This helps to delete that particular pod from K8s.

Thursday, October 18, 2018

Error starting host: Error getting state for host: machine does not exist

Error when starting minikube after a delete

C:\Windows\System32>minikube start
Starting local Kubernetes v1.10.0 cluster...
Starting VM...
E1018 10:37:54.731596    8556 start.go:174] Error starting host: Error getting state for host: machine does not exist.

 Retrying.
E1018 10:37:54.750682    8556 start.go:180] Error starting host:  Error getting state for host: machine does not exist

C:\Windows\System32>

Solution to fix this error:

1. Change the folder to your .minikube (for me its C:\Users\shvijai\.minikube\cache\iso)
2. Delete the minikube iso file
3. Try minikube start

It works.

Wednesday, October 17, 2018

No compiler is provided in this environment. Perhaps you are running on a JRE rather than a JDK?

Error when i do "mvn package"

No compiler is provided in this environment. Perhaps you are running on a JRE rather than a JDK?

I am not using any IDE, i am using my cmd prompt. My java version is 1.8 and maven version is 3.5

Solution:
1. Got to your project folder and find the pom.xml file
2. Find the line having "<artifactId>maven-compiler-plugin</artifactId>"
3. Add the following line (based on your java location path)

<plugin>
         <groupId>org.apache.maven.plugins</groupId> 
         <artifactId>maven-compiler-plugin</artifactId>
          <version>3.1</version>
  <configuration>
<fork>true</fork>
<executable>C:\Program Files\Java\jre1.8.0_181\bin\javacpl.exe</executable>
  </configuration>

 </plugin>

4. Save the pom.xml
5. Run "mvn package", it will work.

Wednesday, September 26, 2018

Compare Wercker and Jenkins

Here, I am trying to explore the features of Wercker and Jenkins. Its clear that the Jenkins has a good end-user count, and it can install in your local networks.

Here is a high level comparison


  • Wercker’s Open Source CLI tool enables developers to do much of the rapid iteration in a build/test/deploy model without leaving their local development environment, the Wercker CLI runs the same core tech of our online SaaS product so developers can move toward achieving dev/prod parity. Jenkins is a do-anything box. You have to spend time setting it up to do Docker runs, including keeping your build environment clean.
  • Wercker Pipelines enables full build, test and deployment pipelines to be executed, with Docker as a first class citizen, everything runs in a docker container and artifacts can be docker containers. In Jenkins we need to add slave node pools. The jobs will run on these nodes.
  • Wercker Releases is a private Docker registry that allows you to store your Docker container images on Oracle Cloud Infrastructure for fast, scalable retrieval and deployment. Wercker container registry is fully Integrated with Wercker pipelines and clusters. In Jenkins, we need to add and configure the registry.
  • Wercker clusters is a fully managed Kubernetes engine running on high performance Oracle Cloud Infrastructure. Tightly coupled to Wercker Releases and Pipelines. Clusters is dynamically scalable from one dashboard on the Wercker interface. For Jenkins, we need to manually configure to scale automatically.
  • Wercker is extensible and can be more deeply integrated in to other parts of the application development process. In the case of Jenkins, we need to depend on plugins and these plugins may not be the exact use case for us.

  • Wercker is based on simple yml instructions using our community of public steps (that don't need to be downloaded, installed). In Jenkins we need to learn groovy scripting

  • In Wercker your configuration is stored in your application repo rather than in a dedicated Jenkins repo which makes the project more portable and easier to on board new devs.

Monday, September 24, 2018

How to setup NFS filer (File Storage) in OCI

Purpose:
This document will help to create NFS file storage system in OCI. We mainly used this storage for Kubernetes application storage. The docker running on this host will automatically mount this storage. 

Steps in creating NFS filer are the following:

1. Login to your cloud account.
2. From Action Menu, select File Storage

3. Click on "Create File System", choose the compartment, input the name and availability domain.

4. Click on the "mydatastore" File Storage, you can see mount targets and its details.

5. Note down the commands for mounting this datastore into the client machines, by clicking on "mount commands"
6. Login to the client machine and issue the noted mount commands. 
7. Check df -h or fdisk -l to verify the mounts.

Wednesday, September 19, 2018

How to create Oracle MySQL Cloud Service

Oracle MySQL Cloud Service is a single MySQL server having full access to the features and its operations.

Steps in creating an instance of Oracle MySQL Cloud Service

1. Login to your cloud account.
2. From Action Menu, select Open Service Console

3. Click Create Service
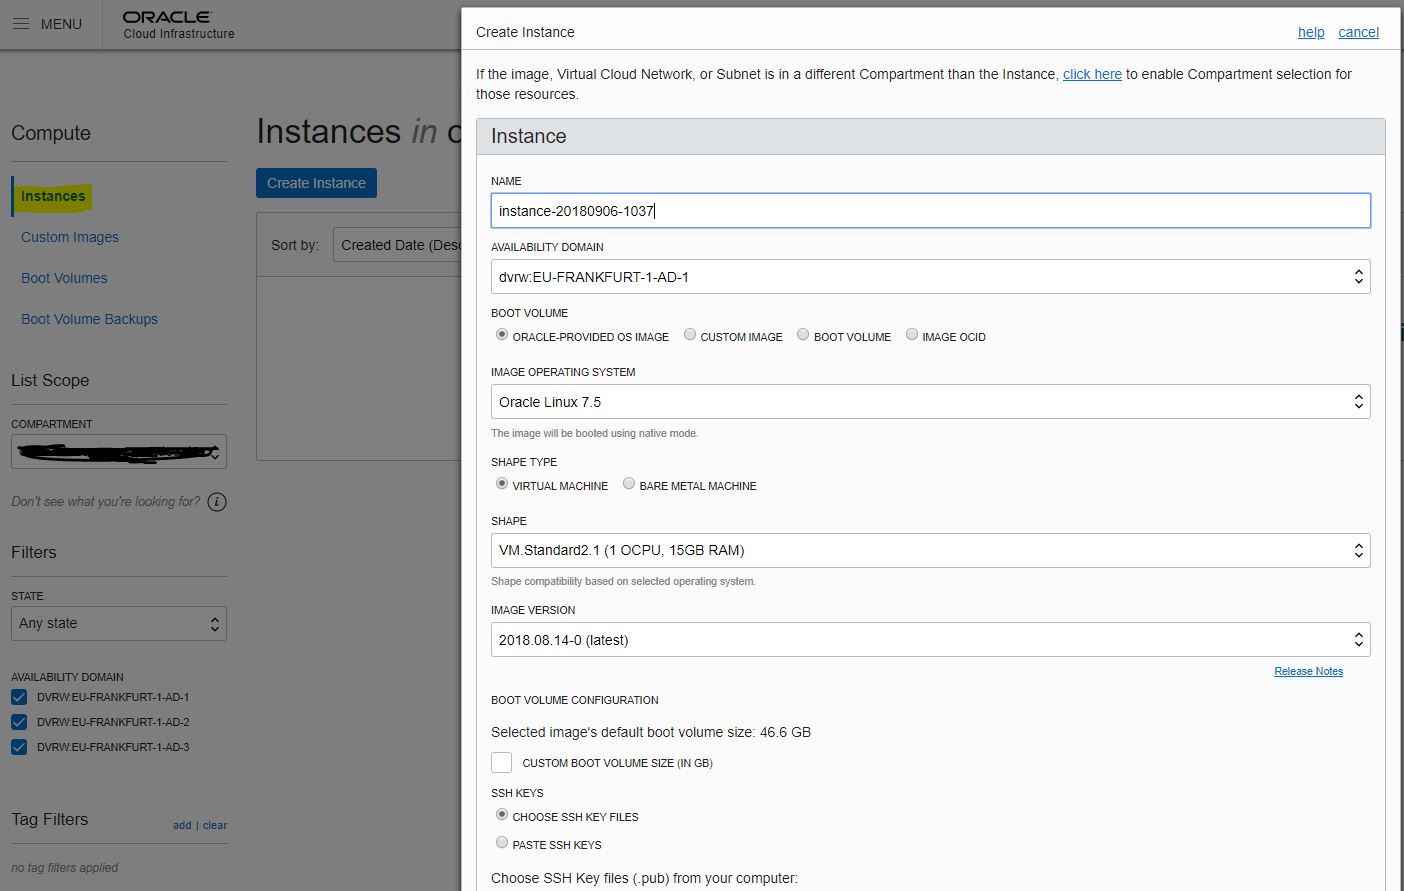
4. Input the Instance Name, Region and Availability Domain

5. Next page, input the compute shape, ssh key, cloud storage container, username, password, storage size, administrator username, password, database schema name and port.

6. Once you confirm, you could see the mysql instance running in your dashboard.
7. With your ssh keys and inputed connection string, you can either ssh or connect database from your application.

Appendix

How to create an Object Storage in OCI

Purpose:
Object storage in OCI is an internet-scale, high-performance storage platform that offers reliable and cost-efficient data durability. It can hold
your static contents like images, pdfs, files etc. There are two types of storage tier - Standard (hot storage) and Archive (cold storage).

Steps in creating Object Storage:
1. Login to your OCI account.
2. Navigate to Menu --> Object Storage --> Object Storage

3. Click on "Create Bucket"
4. Select the storage tier, by default it will be Standard
Appendix:
Overview of Storage
Managing Buckets

Tuesday, September 18, 2018

How to create an OKE cluster

Purpose: 
Creating an OKE cluster in OCI. Once cluster is ready, you can deploy your application.

Assumption:
1. You already have an OCI account with proper roles and policies to create and configure OKE.
2. You have a VCN, subnets

Steps in setup and configuration:
1. Login to your OCI account.
2. Navigate to Menu --> Developer Services --> Container Clusters (OKE)

3. Choose the correct compartment
4. Click on the "Create Cluster" button and input the name, K8s version, VCN, subnets and if needed the CIDR block for the b8s service.

5. Wait for some time, the Cluster status needs to change from "Creating" to "Active"
6. Click on the created cluster name
7. Add Node Pool
8. Input name, version, image, shape, subnets, quantity per subnet, public ssh key and labels.
9. Wait for some time, you can see the node pools getting machine allocated and it will install all the necessary softwares and packages.
10. Once its ready, you can login to those worker machines.

How to Access Kubeconfig:
Following steps demonstrated how to access the OKE kubeconfig file.
1. You need to download and install the OCI CLI and configure it for use.
2. mkdir -p $HOME/.kube
3. oci ce cluster create-kubeconfig --cluster-id ocid1.cluster.oc1.eu-frankfurt-1.aaaand --file $HOME/.kube/config

More links:
https://docs.cloud.oracle.com/iaas/Content/ContEng/Concepts/contengprerequisites.htm
https://docs.cloud.oracle.com/iaas/Content/API/SDKDocs/cliinstall.htm?tocpath=Developer%20Tools%20%7CCommand%20Line%20Interface%20(CLI)%20%7C_____1
https://docs.cloud.oracle.com/iaas/Content/API/SDKDocs/cliconfigure.htm?tocpath=Developer%20Tools%20%7CCommand%20Line%20Interface%20(CLI)%20%7C_____2
https://docs.cloud.oracle.com/iaas/tools/oci-cli/latest/oci_cli_docs/cmdref/ce.html#description

Sunday, September 16, 2018

Introduction to rsync, a free powerful tool for syncing data

Rsync (Remote Sync) is a command for copying and synchronizing files and directories remotely as well. You can easily mirror your data by comparing source and destination.
For a typical transfer, rsync compares filenames and file timestamps on the source and destination directory trees to assess which files should be transferred.
Also rsync can effectively resume transfers that have been halted or interrupted.

Advantages of Rsync:

  • It efficiently copies and sync files to or from a remote system.
  • Supports copying links, devices, owners, groups and permissions.
  • It’s faster than scp (Secure Copy).
  • Rsync consumes less bandwidth


How to install Rsync:
By default rsync package is bundled with OS, else you need to use your package mangers like yum, apt-get to install rsync.

Basic Syntax:
rsync [options] source destination

Some common options used with rsync commands:
-v : verbose
-a : archive mode
-z : compress file data
-h : human-readable
-r : copies data recursively 

To Sync two data centers with delete optionsrsync -avz --delete 11.0.2.2:/data/ /data


Here are some of the examples, have a try in a test environment or use a dry run option:

1. Copy/Sync a File on a Local Computer
[root@shvijai]# rsync -zvh myfilesp.tar /tmp/backups/

2. Copy a Directory from Local Server to a Remote Server
[root@shvijai]$ rsync -avz www/ root@192.168.0.101:/home/

3. Copy/Sync a Remote Directory to a Local Machine
[root@shvijai]# rsync -avzh root@192.168.0.100:/home/shvijai/www-files /tmp/mywebsite

4. Copy a File from a Remote Server to a Local Server with SSH
[root@shvijai]# rsync -avzhe ssh root@192.168.0.100:/root/backup.log /tmp/

5. Copy a File from a Local Server to a Remote Server with SSH
[root@shvijai]# rsync -avzhe ssh mybackup.tar root@192.168.0.100:/mybackups/

6. Use of –include and –exclude Options
[root@shvijai]# rsync -avze ssh --include 'R*' --exclude '*' root@192.168.0.101:/var/lib/rpm/ /mnt/rpm

7. Use of –delete Option
[root@shvijai]# rsync -avz --delete root@192.168.0.100:/var/lib/rpm/ .

8. Automatically Delete source Files after successful Transfer
[root@shvijai]# rsync --remove-source-files -zvh mybackup.tar /mnt/mybackups/

9. Do a Dry Run with rsync
root@shvijai]# rsync --dry-run --remove-source-files -zvh mybackup.tar /mnt/mybackups/

Friday, September 7, 2018

Setting up a NAT instance in Oracle Cloud Infrastructure

Goal

In multi tier architecure design, we are placing our databases in a private subnet with no public IP and web-servers in public subnet which can have public IP. The Idea here is only the front end web-servers will be able to communicate with the backend servers, and backend servers cannot be directly accessed by outside world. But in some cases we may need internet access on private subnet machines for updating/installing softwares, patches etc. Here I will show you how to achieve this goal by using a NAT instance in OCI.

What we are going to do?

Our plan is to configure a Linux box in public subnet as a router (NAT - Network Address Translation). All the machines in the private subnet to initiate outbound IPv4 traffic to the internet at the same time those instances are prevent from receiving inbound traffic initiated by someone on the internet. The route table for those machines in private subnet will be the nat instance IP.

Architecture


Assumption
  • You have an OCI account with needed permissions to create instance, network components.
  • You already have a compartment to work on.

Follow the steps to reach our goal

Create VCN and Internet Gateway

Create a VCN with CIDR block value will be 10.0.0.0/16


Create Public and Private Route tables


Create Private and Public Security Rules
We can add rules later for each security list, let it be clean now


Create Private and Public Subnet
Private subnet maps to CIDR Block 10.0.0.0/24 , Private Route Table, Private Security List and Public subnet maps to CIDR Block 10.0.10.0/24 , Public Route Table, Public Security List


Edit Public and Private Security List to allow the following IP and protocol

Ingres Rules for Public Subnet
- Allow SSH from anywhere 0.0.0.0/0
- Allow Ping ICMP from hosts in the Private Subnet 10.0.0.0/24
- Allow TCP from hosts in the Private Subnet 10.0.0.0/24
Egress Rules for Public Subnet
- Allow outgoing All Protocols to go out Everywhere 0.0.0.0/0
Ingres Rules for Private Subnet
- Allow SSH from 10.0.10.24
Egress Rules for Private Subnet
-Allow Outgoing all protocols to everywhere 0.0.0.0/0

Create backend Server , Attach it to Private Subnet


Create NAT Instance , Attach it to Public Subnet


VNIC Configurations under Public Subnet

On NAT instance, edit the VNIC for to enable "Skip Source and Destination check"


Add one more Private IP Address 10.0.10.20  and Select NO Public IP


SSH to Public IP of NAT Instance

Login to the public server and upload your private ssh key to login to the private subnet server. Confirm whether you can SSH to private server from the public server

We need to configure this machine as a router. Create file to be used when enabling ip forwarding

vi /etc/sysctl.d/98-ip-forward.conf

net.ipv4.ip_forward = 1 

Save the file.

Run firewall commands to enable masquerading and port forwarding

firewall-offline-cmd --direct --add-rule ipv4 nat POSTROUTING 0 -o ens3 -j MASQUERADE

firewall-offline-cmd --direct --add-rule ipv4 filter FORWARD 0 -i ens3 -j ACCEPT

/bin/systemctl restart firewalld

sysctl -p /etc/sysctl.d/98-ip-forward.conf

Setting up NAT Address to all incoming traffic to NAT

This rule allows packets from the private subnet to route through the NAT instance (10.0.10.20)


Its the time to TEST

Login to your private server, see whether you can ping oracle.com or even curl/wget to oracle.com. Also you can see whether yum update works or not.
This means all the packets get routed to the NAT instance and from there it reaches to the internet gateway.
I am pretty much sure that you are thinking to automate this. No worries, we already have a Terraform scripts to automate the entire process. Want to know more, Click here

Friday, August 17, 2018

My first experience with JenkinsX


As a DevOps engineer, I thought JenkinsX is a CI/CD tool for containers to build in K8s environments. But it's wrong. JenkinsX is an attempt to automate the whole development process end to end for containerized applications based on Docker and Kubernetes. JenkinsX is an Open Source project and is not a fork of Jenkins. JenkinsX reuses Jenkins Core and it has set of additional tools to achieve its goal. It is easy to customize JenkinsX as we can edit or replace any of its tool sets.
JenkinsX address the following problems:
  1. Frequent deployments
  2. Low Mean Time to Recover
  3. CI/CD
  4. Configuration as Code
  5. Automated Release Management
Once JenkinsX installed, it setup and configure the following for you:
  1. Create a Git repo for a new application with development, staging and production environment.
  2. Create a pipeline configuration in Jenkins for a new application and connect it with a Git repo
  3. Automate the DevOps processes (like builds, artifacts and containers creation and deployments) based on Git operations (branching, commits, PR creating, PR merging)
Building Blocks of JenkinsX:
Strengths of Jenkins X:
  1. It address the pain points and streamlining implementation of DevOps/GitOps principles. It saves a lot of time for new project implentations.
  2. Concept of JenkisX is very strong.
  3. Good toolset, which is already configured and works (k8s, Jenkins, Docker registry, Chartmuseum, Monokular, Nexus)
  4. "JX Quickstarts" make a creation of new apps an easy ride
  5. Ability to customise the pipelines and their templates
  6. It provides a preview environment, which helps in decision making for pull requests.
Not that good points of Jenkins X:
  1. Jenkins X is another framework to learn.
  2. Still its a baby, a lot of things to implement and improve
  3. Documentation lacks comprehensive, it has only basic information
  4. Migration of existing CI/CD pipelines into Jenkins X is difficult
  5. For each team, we need to deploy each JenkinsX instance
JenkinsX Flow:

How to install Mysql8 on OEL7.5

How to install Mysql8 on OEL7.5

Login to the server:

wget https://dev.mysql.com/get/mysql80-community-release-el7-1.noarch.rpm
rpm -ivh <filename>
yum install mysql-community-server -y
systemctl enable mysqld.service
systemctl start mysqld
grep 'temporary password' /var/log/mysqld.log (for getting the temporary password)
/usr/bin/mysql_secure_installation

Wednesday, August 15, 2018

Errors occurred deleting machine: Error deleting host: minikube: Error loading host from store: The system cannot find the file specified.

Error:
When I delete or start my minikube on windows10 machine, I am getting the following

C:\Users\shvijai>minikube delete
Deleting local Kubernetes cluster...
Errors occurred deleting machine:  Error deleting host: minikube: Error loading host from store: open C:\Users\shivin\.minikube\machines\minikube\config.json: The system cannot find the file specified.

Solution for this issue:

Remove the folder .minikube from C:\Users\shivin\
Start minikube again (minikube start)
Then you can see the VM getting downloaded.

Tuesday, August 14, 2018

How to create an insecure registry in OEL7+

I won't encourage you to create an insecure registry. But for me I need to setup this for a demo purpose. I was using an OEL7.4 OS.

Login to the server, update the file with your local registry details:

vi /etc/docker/daemon.json
{
  "storage-driver": "overlay2",
  "ip-masq": false,
  "insecure-registries": ["10.96.202.190:5000"],
  "log-driver": "json-file",
  "log-opts": {
    "max-size": "20m",
    "max-file": "10"
  }

}

Here in my case, 10.96.202.190:5000 is the local registry. You need to change with yours.

systemctl daemon-reload
systemctl restart docker

Click the link How to test your registry?

How to test docker registry

This is just a sample test, whether your docker registry is working fine or not. We will pull an image and then tag and push it to the registry. Here I have a local registry "192.168.0.2:5000"

# sudo docker pull busybox
# sudo docker images 
# sudo docker tag <image-id> 192.168.0.2:5000/busybox
# sudo docker push 192.168.0.2:5000/busybox

If you didn't get an error, your docker registry is working fine. Else you may face some "certificate error" or "http server gave http response to https client"

Thursday, July 12, 2018

Jenkins Pipeline Parameter

Little background : I am running an inspec test for couple of servers. I accept server ip's as a jenkins parameter. Each IP the inspec test for the mysql profile should execute.

Parameter "IP_MYSQL" holds server ips

node{
    cleanWs()
stage('Checking MySQL'){
    echo 'Inspec test for mysql'
    withCredentials([file(credentialsId: 'mysql-prod', variable: 'SSH_KEY')]) {
    sh '''
sudo git clone https://github.com/dev-sec/mysql-baseline
cd mysql-baseline
    echo "${IP_MYSQL}" | sed -n 1'p' | tr ',' '\n' | while read IP; do
            sudo cp ../inspec.yml inspec.yml
            sudo sed -i -e "s/mysql-baseline/mysql-baseline-$IP/g" inspec.yml
            cd ..
            sudo inspec exec mysql-baseline -t ssh://clouduser@$IP -i $SSH_KEY --reporter junit:Report_$IP.xml || true
        done
'''
junit '*.xml'
    }
  }
}
}

Wednesday, June 13, 2018

failed to link /usr/share/man/man1/java.1 -> /etc/alternatives/java.1: No such file or directory

Error : failed to link /usr/share/man/man1/java.1 -> /etc/alternatives/java.1: No such file or directory

I am trying to install a java rpm in a docker container via dockerfile. I got the above error while installing rpm.

The reason is its a small container that cause the error. A workaround for getting out of this error is to create a directory before the rpm installation in your dockerfile.

mkdir -p /usr/share/man/man1

This works for me :)

Get https://registry-1.docker.io/v2/: net/http: request canceled while waiting for connection (Client.Timeout exceeded while awaiting headers)

Getting the following error in docker:

Get https://registry-1.docker.io/v2/: net/http: request canceled while waiting for connection (Client.Timeout exceeded while awaiting headers)

Issue fix:

1. cd /etc/systemd/system/docker.service.d  (If not present, create this directory structure)
2. Create a file http-proxy.conf in that path and update the following
Environment="HTTP_PROXY=http://yourproxy.com:80/"
Environment="NO_PROXY=localhost,127.0.0.0/8,docker-registry.somecorporation.com"
3. systemctl daemon-reload
4. systemctl show --property Environment docker
Environment=HTTP_PROXY=http://yourproxy.com:80/
5. systemctl restart docker

This fixed my issue. I am using OEL7.5

Friday, April 13, 2018

How can I enable root ssh access in EC2

My requirement is, I need to disable the key authentication and I need to enable root ssh access to my AWS EC2 server.

How can I do that?

Login to your EC2 server with key authentication first
vim /etc/ssh/sshd_config
Disable - PermitRootLogin forced-commands-only and update the same with PermitRootLogin yes
Disable - #PermitEmptyPasswords no and update the same with PasswordAuthentication yes

/etc/init.d/sshd restart

Give root a good password.

Try to login with SSH and given root password.

################
[root@server-01 ~]# grep 'PermitRootLogin forced-commands-only' /etc/ssh/sshd_config
PermitRootLogin forced-commands-only
[root@server-01 ~]# cat /etc/ssh/sshd_config | grep PermitEmptyPasswords
#PermitEmptyPasswords no

[root@server-01 ~]#
################
Make sure this is like this.
# EC2 uses keys for remote access
PasswordAuthentication yes